
How to Apply Cream or Liquid Blush Without Lifting Foundation: A Beginner-Friendly 6-Step Routine
September 7, 2026 · v13cormier@gmail.com
Affiliate disclosure: This article contains affiliate links. Glow & Grow Beauty may earn a commission from qualifying purchases at no additional cost to you.
Cream and liquid blush can make the complexion look fresh and dimensional, but beginners often run into one frustrating problem: the blush seems to erase, separate or move the foundation underneath. Usually, the fix is not more foundation. It is controlling how much blush reaches the cheek and how much pressure you use to blend it.
This six-step routine works with a brush, sponge or clean fingertips. It is designed to preserve natural-looking skin texture—not promise an airbrushed finish—and it can be adjusted for sheer cream formulas or highly pigmented liquids.
The beginner rule
Place less product than you think you need. You can build another thin layer. Removing a heavy patch of concentrated blush usually requires more blending, which is exactly what can disturb the base.
What You Need
- A cream or liquid blush in a shade you enjoy
- A small dense synthetic brush, damp sponge or clean fingertips
- A clean palette or the back of a freshly washed hand
- Your foundation or skin tint
- Optional: translucent or coordinating powder blush for extra setting
How to Apply Cream or Liquid Blush Without Lifting Foundation
Step 1: Build a thin, even base
Apply skincare in light layers and give it time to settle before makeup. Press foundation onto the skin rather than rubbing it repeatedly. If you need extra coverage on a blemish or dark spot, add concealer only where needed. A thick, still-wet base is easier to move when blush goes on top.
Step 2: Let the foundation settle
Wait a minute or two after foundation so the surface no longer feels very slippery. You do not have to powder the entire face first. If you become shiny quickly, lightly set the center of the forehead, sides of the nose and chin while leaving the cheeks mostly unset for cream blush.
Step 3: Decant the blush instead of dotting heavily
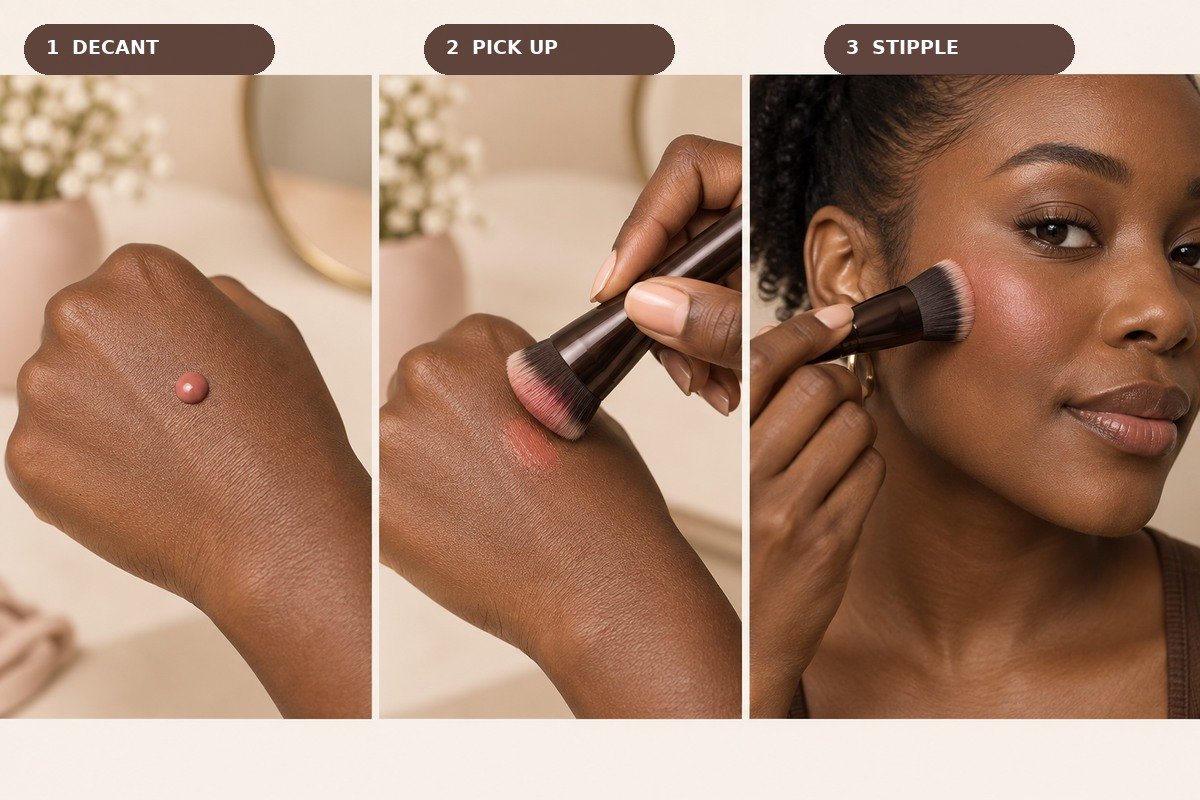
For liquid blush, place one small dot on a clean palette or the back of your hand. For a cream compact, tap the surface once or twice with your brush or fingertip. Working from a separate surface lets you spread out the pigment and control how much reaches the face.
Step 4: Press the blush onto the upper cheek
Tap the brush onto the upper cheek, beginning slightly behind the outer corner of the eye and blending toward the temple. Use short pressing or stippling motions. Avoid long swipes, hard circles and repeated back-and-forth rubbing. If you prefer color on the apples of your cheeks, place the first tap there, then soften the edge outward.
Step 5: Blend the edge—not the center
Keep the strongest color where you first placed it. Use the clean side of your brush or sponge to tap only around the outer edge until there is no obvious border. If an area looks patchy, do not scrub it. Press a tiny amount of leftover foundation around the edge to reconnect the blush with the base.
Step 6: Build and set strategically
Check both cheeks in natural light before adding more. For extra color, repeat one thin layer. If you want a longer-wearing finish, lightly press translucent powder around the cheek or add a small amount of coordinating powder blush on top. Finish with setting spray and let it dry without touching the face.
Beginner-Friendly Products and Tools
These recommendations have different pigment levels and finishes. They are examples—not claims about products used in the editorial images. Product names and intended uses were checked against official brand information on September 7, 2026.
Sheer cream blush
Fenty Beauty Cheeks Out Freestyle Cream Blush
A light, non-greasy cream blush designed to melt into skin with a sheer, natural-looking wash of color.
Pigmented liquid blush
Rare Beauty Soft Pinch Liquid Blush
A weightless liquid formula available in dewy and matte finishes. The brand recommends a small amount because the color is concentrated.
Dewy liquid blush
e.l.f. Camo Liquid Blush
A lightweight, high-pigment liquid blush with a soft dewy finish that is designed to be blended and built.
Angled synthetic tool
e.l.f. Liquid Blush Brush
A soft, dense angled brush made for stippling and blending cream and liquid cheek products.
How to Choose a Blush Shade
Use undertone as a starting point, not a strict rule. Peach, coral and terracotta often read warm; rose, berry and plum often read cool; muted pink and rosy-brown can feel more neutral. On deeper complexions, saturated coral, berry, brick and wine shades may show more clearly than very pale pastels. Test the color on your own skin in daylight rather than assigning yourself the shade shown on a model.
Troubleshooting
- The blush looks patchy: pick up less product and press it onto a smaller area before softening the edges.
- The foundation keeps moving: let the base settle longer and switch from rubbing to stippling.
- The color is too strong: tap a clean damp sponge over it or press a whisper of foundation around the perimeter.
- The two cheeks look uneven: work in thin alternating layers instead of finishing one cheek completely first.
Hygiene and safety
Apply cosmetics only to healthy, unbroken skin. Keep containers clean, wash reusable tools regularly, do not share products that touch the skin directly and stop using a product if it causes persistent irritation. Follow the package directions and storage guidance.
Frequently Asked Questions
Should cream blush go before or after powder?
It is usually easiest to apply cream or liquid blush before setting the cheeks heavily with powder. If your base is already powdered, use a very small amount and press gently instead of dragging.
Can I use my fingers?
Yes. Warm a tiny amount between clean fingertips, then tap it onto the cheek. Avoid rubbing. A clean sponge can soften the edge afterward.
Where should blush sit on a round face?
Placement is personal. Higher placement can create a lifted visual effect, while concentrating color on the apples looks softer and more youthful. Try both and photograph the result in daylight.
Do I need powder blush on top?
No. Add it only if you want more intensity or a more set finish. Use a light hand so the cheek does not become heavy or cakey.
Complete the Routine
Compare more formulas in our guide to seven cream and liquid blushes. You may also like our tutorials on setting makeup without looking cakey and prepping dry, textured skin for foundation.